 White Belt Form – Taegeuk Il Jang
Taekgeuk Il Jang or more informally known number as Tae Kwon Do Form 1 is the very first of a total of 8 poomsae’s or forms that is sanctioned by both the WTF( World Tae Kwon Do Federation) and Kukkiwon.
The reason the title is Taeguek Il Jang instead of just Form 1 (how boring) is because in the Korean language. “IL” is defined as number 1 in the sino Korean system of numbers and jang, in the same sino Korean system means chapter, so put all together its Tageuk Chapter 1 and is the beginning of your journey.
This initial form, which is much simpler and easier than most of the other forms you will learn, represents the source of creation by presenting the most basic techniques – the Low Block, Inside Middle Block, Middle Punch and Front Kick.
Taegeuk Il Jang is the foundation from which all other forms are built.
Most of this form is performed in a walking stance, which is easy for a beginner to maintain and the student also learns to shift from one stance to another
Terms Used in this Form:
- Joon Bi Seogi– Ready Stance (i.e. “at ease”)
- Ki Hap – Shout
- Poomsae – Form
- Momtong Jireugi – Middle Punch
- Arae Makki – Low Block
- Ap Seogi – Walking Stance
- An Makki – Inner Block
- Ap Chagi – Front Kick
Video of White Belt Form Taegeuk Il Jang
Here is a video of the performed as some people find it easier to follow visually. (I dared not make my own video of this)
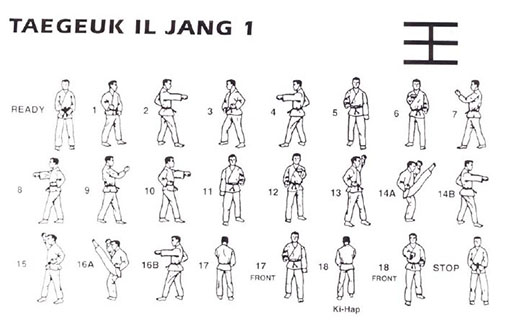
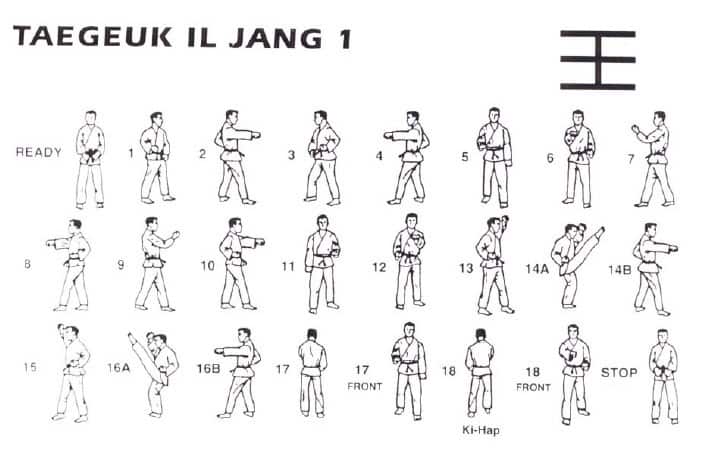
Form 1 – Taeguek Il Jang Step by Step
From your ready stance with your feet apart (shoulder width), arms raised and forming fists with your hands as you lower them in front of your navel, and elbows slightly bent;
This is called the Joon Bi Seogi and it is where you often start and finish your Taegeuk forms!
Step 1:
The first step of your Taegeuk Il Jang is to turn to your left, with both your left foot and left hand in front and the right foot and right hand behind.
You will perform a left low block and it is done by moving your left hand to reach the front of your right shoulder while moving your right hand to reach your left oblique/waist before pushing your left arm downwards about a ruler’s length in front of you.
Then pulling your right arm to your right oblique, while simultaneously moving your right foot to face the left side to allow your whole body to face left.
Step 2:
Pull your left arm back to your waist and punching your right arm directly in front of you while also stepping your right foot forward once.
Before you punch, make sure to slightly turn your waist to the side of your punching arm to get more momentum and force!
Your arm should be straight and aligned with your chest; this is your right middle punch or Momtong Jireugi.
Step 3:
Turn with your left foot by slightly spinning it 180 degrees to face your right side and step your right foot forward once again.
While doing this, your arms must be moved so that your right arm reaches your left shoulder while your left arm reaches your right oblique to exert force as you push your right arm downwards and pull your left arm to your left oblique in a right low block.
Step 4:
Step forward once with your left foot while also punching your left arm directly in front of you, just like in the second step but using your left side instead of your right. This is a left middle punch!
Step 5:
Face forward using your right foot to turn and stepping your left foot forward and execute a left low block!
Step 6:
Simply transition from the left low block to a right middle punch.
Step 7:
Turn with your left foot, Making your right foot in front to face your right side and then execute a left middle block.
Step 8:
Step forward with your left foot once while punching a right middle punch.
Step 9:
Turn 180 degrees with your left foot forward and right hand in a middle block.
Step 10:
Switch to a left middle punch, step forward once with your left foot while executing a left middle punch!
Step 11:
In the eleventh step, you must face forward by sliding your right food 90 degrees and then execute a right low block.
Step 12:
Continue with the twelfth step by switching from your right low block to a left middle punch.
Step 13:
Turn back 90 degrees to face your right with your left leg in front and left right arm blocking above your head while your left arm is beside your left oblique.
Step 14:
Now for the fourteenth step; here, you’re going to execute your first front kick with your right leg by lifting it up with your knee folded and releasing the knee to kick with force. Do this while bringing down your left arm to your face and then land your right foot aligned with your right shoulder as you bring your right arm to a middle punch.
Step 15:
For the fifteenth step, all you have to do is turn 180 degrees to face your left and repeat the thirteenth step, this time with your right arm blocking your head and right leg in front of the left.
Step 16:
For the sixteenth step, repeat the fourteenth step but this time use your left leg to do your front kick and your left arm will execute the middle punch!
Step 17:
From where you are now, turn 90 degrees to your right to face the back with your left foot forward and execute a left low block, this is the seventeenth step! Just like the eleventh step, right?
Step 18:
Now repeat the twelfth step but this time use your right arm to deliver the middle punch while bringing your right leg forward and that’s the final step!
End:
As I said earlier, you usually end in your Joon Bi Seogi, so turn 180 degrees to face front and proceed with the execution of Joon Bi Seogi!
Keep in mind the following when practicing forms:
- Forms should begin and end at exactly the same spot. This indicates the quality of the student’s stances and technique.
- Correct posture and body position must be maintained at all times.
- Muscles of the body should be either tensed or relaxed at the proper, critical moments in the form.
- The exercise should be performed in a rhythmic movement with a relax motion. The more tense you are the slower your technique will be.
- Speed of the forms should speed up or slow down according to the requirements of that form.
- Exhale on exertion for each movement in order to maximize power.
- Each pattern should be perfected before moving to the next.
- Its important to know the purpose of each movement in this form..
Form Tips
In performing this form as well as all the others, you should think not of executing techniques in a vacuum, but rather of responding to attacks from a number of opponents surrounding you
You should always turn your head first, look at your imaginary opponent, then perform the required block or attack. It’s also worth mentioning to listen to your body and don’t force yourself to learn something you personally aren’t ready for yet; in cases like these, practice slowly until you feel comfortable enough to try again!
Reminders
Always wait for the “Baro!” or end signal of your master before getting into Joon Bi Seogi after every form; this shows that you are taught to be disciplined during Tae Kwon Do sessions.